Virtual Machines - Using Virtual Box
- adwilson99
- Oct 21, 2020
- 4 min read

Sometimes we need to hop into another linux distro, just to troubleshoot a problem. For example many of the servers that I work on as part of my job run RedHat Enterprise Linux. Under the hood it works slightly different from my beloved elementaryOS.
(Ok geek speak alert! skip this bit as it has nothing to do with Virtual Box :D)
Anyhows CentOS is a free standin for RedHat Enterprise Linux and most things that work in CentOS work the same way in RedHat, so its a good way to allow me to try things out and troubleshoot items, that I wouldn't want to do on works servers.
OK back to Virtual Box.
Virtual box is an open source alternative to the popular VMWare. It's also included in elementaryOSs app center. So lets get in with the install.
1) Open up the App Centre and search for "VirtualBox" and install it
2) If using your "JOI Book" like me, please make sure you have enough RAM and Disks space, when you run virtualbox, you're effectively running a virtual mini computer on top of your laptop. Make sure you visit the ZRAM and diskspace posts in this blog to ensure you have sufficient Ram and diskspace. For CentOS VM, you need a minimum, of 1GB ram and 6GB diskspace.
3) Download the linux ISO that you want to try, In my case CentOS (https://www.centos.org/download/ )
4) While downloading the ISO, we can setup the virtual machine in virtualBox. Start VirtualBox from the applications menu in the top left hand corner of elementaryOS
once started you should see the window below.

5) Click on "New" icon at the to left.
6) Enter a name for your virtual machine. NOTE: Virtualbox can run windows under linux if you really want to, however note the following:
1) you need a valid windows license (it ain't free!)
2) If you're running on your lovey JOIBook like me, you don't have enough RAM to run both at the same time, setup a dual boot instead. (you'll need to google for how to do that as that's a whole different article that I don't have time to write now)
Enter a name, Type should Linux, Version "Red Hat (64-bit)" (note even though CentOS is not listed, it still works fine as CentOs is largely compatible with Red Hat)

Click Next
7) Set the amount of RAM you'll give the VM to run (note your JOIBook only has 4GB Ram and it needs most of that to run elementaryOS, so stick to 1GB for CentOS).

Click Next
8) Set the hard drive type (most of the time you can stick with the default). Also if you're short on space, don't worry on the next few screens (see step 10) you can tell Virtual box to dynamically allocate the space (slows the virtual machine down a little, but on the plus side it will only use what diskspace that CentOS actually needs, and if you install more stuff it will add more space)

Click Next
9) For the hard disk image type stick with the default "VirtualBox Disk Image" don't worry about the other two for now :)

Click Next.
10) Set your Virtual Hard Drive size. If you're struggling for disk space (like me) choose Dynamic. If you have enough space choose fixed as it will give you a better performance, but the trade off is it will allocate the full disk size right from the start.

Click Next
11) Set the maximum disk size that the virtual drive will use (since I know the min spec for CentOS is actually 4GB and I'm short on disk space, I'm knocking mine down from 8GB to 4GB max hard drive) Also consider what you would install on CentOS, mine is just a demo system so I won't install much on it, but if you plan to install lots of things (e.g. web servers, dockers, DBs etc) then you'll need more than 6GB.

Click Create
12) The Virtual Machine will now be created (depending on your specs, this may take time or be super quick :D) Once complete, you'll be back at the main VirtualBox window, with your new VM on in the VMlist on the left.

13) Start the VM by double clicking on it or (select it and click the start button at the top)
When it first starts, it will warn you that the disk it's trying to boot off is blank (this is expected as we haven't installed any OS yet, in my case CentOS).
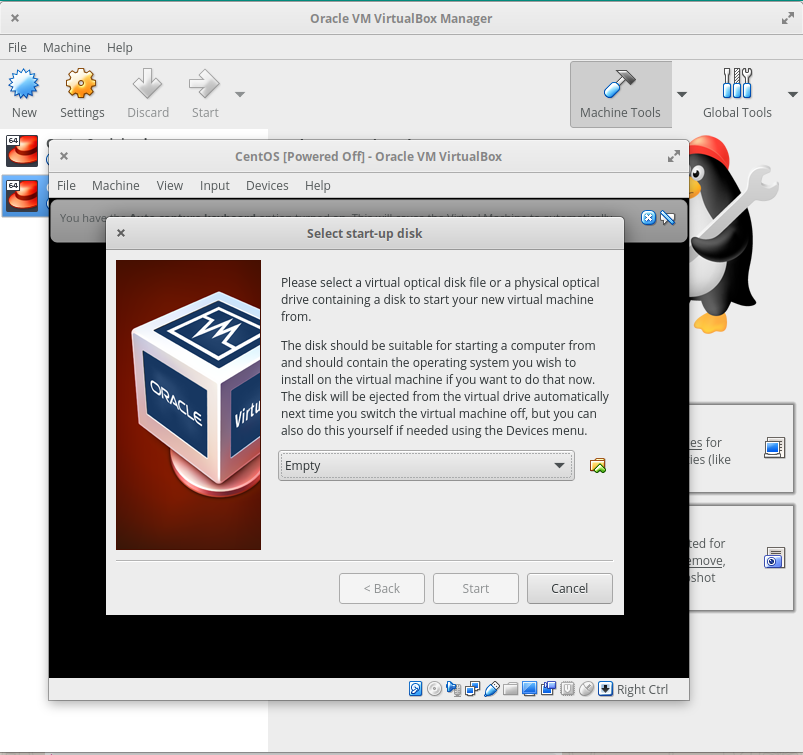
14) By now hopefully your ISO should have finished downloading, if so click on the folder next to the "Empty" drop down, and locate your ISO file. Once it's put in, then click start too boot up your virtual machine from the ISO.

Click Start
15) Your VM should now boot up. In my case you can see the centOS install. I won't go through the installing of CentOS, but at this point you have a working VM and can proceed with the install. For those interested the CentOS install process can be found on their website (https://docs.centos.org/en-US/8-docs/standard-install/)
Oh one hint I will leave you if, if your mouse is stuck or you can't find it, press the "Right" "Control" key on your keyboard, the VM will often capture your mouse, to release it you need to press the Right Ctrl key (note right!, not left).


Comments